Programming a new garage door remote can feel like learning the steps to a simple dance — awkward at first, but quick once you know the moves. If you’ve got a replacement for the Chamberlain RJO70, you’re in the right place. Let me explain this like we’re standing at a coffee table with the remote in one hand and the opener in the other: it’s mostly about finding the right button sequence and making sure the remote and opener “talk” to each other.
Honestly, it’s one of those jobs people put off because they assume it’s technical. Here’s the thing: with a little patience and the right sequence, you can program a new remote for Chamberlain Rjo70 in under ten minutes. I’ll walk you through what to check first, the exact steps to pair or sync, and common troubleshooting like reset and battery issues — all in plain language.
What the Chamberlain RJO70 Remote Is and How It Works
The Chamberlain RJO70 is a fixed-code or rolling-code style remote used with various Chamberlain and LiftMaster openers. You might be wondering which type yours uses — fixed-code remotes send the same signal every time, while rolling-code remotes change the code after each use. That difference matters because the programming steps can change slightly depending on the opener’s model and whether it expects a learned code or a keypad-style code.
Think of the remote like a key and the opener like a lock that needs to recognize the key’s pattern. The opener has a small memory of accepted codes, and programming writes the remote’s code into that memory. If you’ve lost your original remote or need a spare, the new RJO70 must be paired so the opener recognizes it. That’s where the sync or learn button on the garage door motor comes in — it acts like a registrar for new keys.
In practice, programming is a sequence of actions: check the battery, clear any interfering remotes, press the opener’s learn button, and then press the remote button. But you’ll find little wrinkles — like needing to unlock the motor housing, or the opener’s LED blink patterns indicating success or failure. I’ll explain all those signals below so you don’t get stuck guessing what the lights mean.
Before You Start: Tools, Battery, and Safety Checks
First, gather what you need. You don’t need special tools — just the new remote, a fresh battery, a ladder if the motor-head is high, and a steady hand. Replace the battery before you try programming. Weak batteries are the most common reason a new remote won’t pair. For the RJO70, check the battery type printed in the battery compartment or on the label of the remote itself.
Here’s a simple table showing typical battery and LED behavior for Chamberlain remotes. It helps if you want a quick glance while you’re working:
| Item | Common Values |
| Battery Type | CR2032 or CR2016 (check the remote label) |
| Opener Learn LED | Solid or blinking — indicates ready to accept a new code |
| Remote LED | Flashes when button pressed — if dim, replace battery |
Safety first: put the opener in a safe state — don’t have anyone standing under or near the door while testing. If you need to climb to access the opener’s learn button, use a stable ladder and turn off the opener’s power briefly if you feel unsure. These small precautions prevent accidents while you get comfortable with the process.
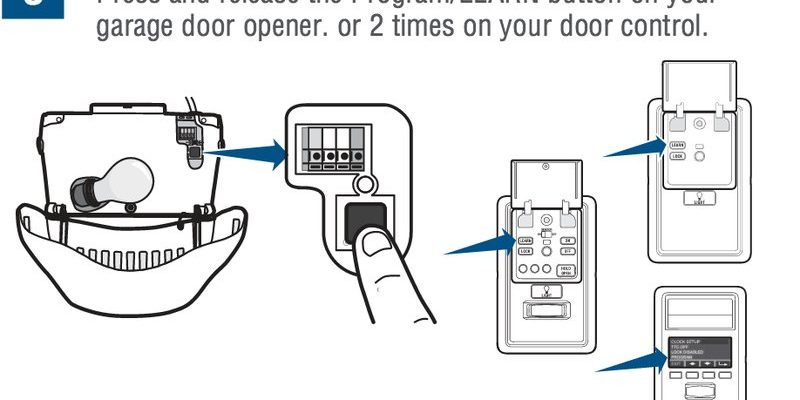
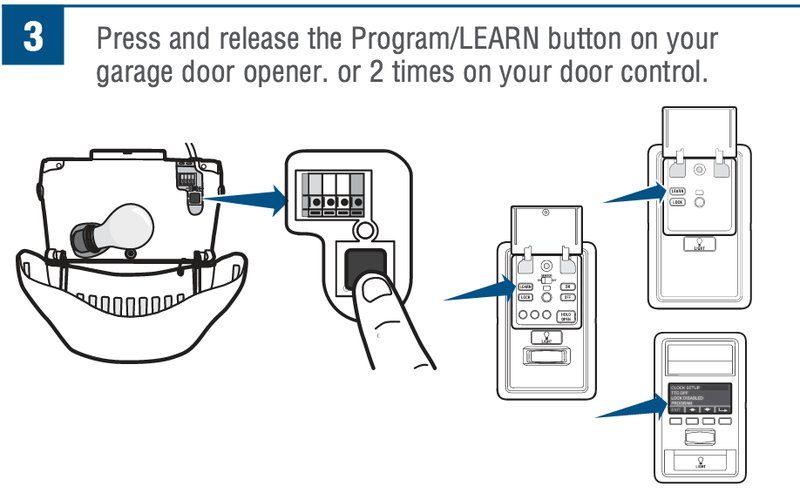
Step-by-Step: How To Program A New Remote For Chamberlain Rjo70
Let me explain the core sequence plainly: you’ll find the opener’s learn or “smart” button on the motor unit. Pressing that button tells the opener it’s ready to accept a new code for a short window — typically 30 seconds. During that window, you press the button on your RJO70 remote. The opener blinks or clicks to confirm it learned the code. That’s the basic pair or sync action.
Step-by-step instructions
- Locate the opener’s learn button (often behind a plastic cover on the motor head).
- Press and release the learn button — an LED should start blinking.
- Within 30 seconds, press and hold the button on the RJO70 remote until the opener blinks or the light changes.
- Test the remote by pressing the button again to open or close the door.
If the opener blinks twice or the LED shows a confirmed pattern, you’ve successfully programmed the remote. If it doesn’t respond, pause and check the remote’s battery and distance from the opener. You might need to repeat the sequence once or twice. Honestly, if you follow those steps calmly, most people get it on the second try — no special code-reading device required.
Reading LED Signals and What They Mean
You might be wondering how to tell if programming worked without guessing. The opener’s LED is the clearest feedback. When you press the learn button, the LED usually blinks to show the opener is in “learn” mode. After you press the remote button, a distinct blink pattern (one long or several short blinks) indicates the code was accepted. If the LED doesn’t blink after you press the remote, it likely didn’t get a strong signal.
Here’s the thing: different models use slightly different blink codes. A single quick flash might mean success on one model and error on another. When in doubt, consult the motor unit label for a legend — many motors print the LED meanings right on the case. If that’s missing, try the sequence again, watch the LED closely, and note the pattern. That observation often gives you the clue you need to move forward.
Tip: If you see rapid blinking or the LED stays solid without changing after pressing the remote, try replacing the remote battery and moving closer to the motor. Those two fixes resolve most pairing problems.
Troubleshooting: Sync Problems, Reset, and Common Issues
If the remote won’t pair, don’t panic — troubleshooting is mostly a checklist. First, check the battery and replace it with a fresh one. Then make sure no other remotes are being programmed at the same time. If your opener has reached its maximum stored remotes, you might need to reset the opener’s memory or delete existing remotes before adding a new one. I’ll cover the reset step next, but try the simple checks first.
Interference can also be an issue. Metal objects, other wireless devices, or even fluorescent lights can sometimes block the signal. Try programming with the remote as close as possible to the motor head, and avoid standing under fixtures that might cause radio noise. If your remote still won’t pair, try a different button on the remote (some remotes have multiple buttons — one might be active).
Finally, if none of that works, consider verifying compatibility. Not all universal remotes or aftermarket parts are full matches for rolling-code Chamberlain systems. If you bought the remote online, double-check the product page for compatibility notes. If you have the correct part and it still fails, call Chamberlain support — they can confirm whether your opener has a firmware quirk or needs a specific sequence to accept new remotes.
Reset, Reprogram, and Advanced Options
Sometimes you want a clean slate — maybe you lost a remote and worry someone else has access. You can reset the opener to erase all stored remotes. The usual approach is to press and hold the learn button until the LED goes out or the motor beeps — that clears the memory. After a reset, you must program each remote again, including any keypad codes. That’s a good time to label your remotes and note which button you assigned to which car.
Let me explain the reset procedure clearly: locate the learn button on the motor, press and hold it for about 6–10 seconds until the LED extinguishes or you hear a confirmation beep. Release it, and the motor’s memory is typically cleared. Now follow the standard pairing steps to add remotes back in. You might have to do this if you’re switching from a fixed-code to a rolling-code system or if the opener’s list of paired devices is full.
Advanced options include using a wall console or keypad to program codes, or integrating HomeLink in your car. If you plan to connect a vehicle’s built-in remote system, follow the car manufacturer’s specific procedure — it usually involves pressing the car’s learn button and then the RJO70 to transfer the code. Honestly, those car systems can be fussy, so have patience and check both manufacturer guides if you hit a snag.
Alternatives: Universal Remotes, Replacement Options, and When to Replace
Not every situation calls for the original RJO70. Universal remotes can work, but there’s a catch: they must support the same code method (rolling vs fixed) and frequency as your opener. If you prefer a single remote that controls multiple garage doors or devices, a universal remote might be the better choice. But be careful — compatibility is the most important factor. Read the product specs and, if possible, buy from a seller who clearly lists Chamberlain compatibility.
Another option is to get a professional install or buy a new opener with modern smart features. If your opener is older and struggles to accept new remotes, replacing the motor head might save headaches long-term. Newer openers also offer Wi-Fi integration, which adds convenience like smartphone control and easier syncing. That said, for most people, programming a new remote for Chamberlain RJO70 is cheaper and faster than replacing the entire opener.
Here’s practical advice: if programming fails after trying fresh batteries, resetting the opener, and checking compatibility, you likely have a bad remote or a hardware issue with the opener. Swap the remote with another known-good unit if you can — that test quickly narrows down the problem. If everything else checks out, contact support or a local garage-door technician.
Closing thoughts: programming the Chamberlain RJO70 isn’t rocket science, but it does reward patience and methodical checks. If you follow the steps above — check battery, enter learn mode, press the remote button, watch the LED, and troubleshoot with the listed tips — you’ll solve most issues. Good luck, and don’t hesitate to come back here if something acts weird while you pair or reset your remote.